Showing posts with label The Robin's Nest. Show all posts

Thursday, January 23, 2014

Riding Lions

Today I am thankful for little boys who just wanted to "ride the lion"  When we went to Disneyland a few years ago with the kids the hotel we stayed at had these lions out in the front.  Porter and Tyson love lions and of course wanted to climb on and have their picture taken.  So of course I pulled out the camera and took pictures of them "riding the lion".
The Robin's Nest had the PERFECT card-stock for these photos. I used the Red Lion card-stock. I used my cricut to cut out the letters as well as the brown side borders.  
I added a little swirl of dew drops also from The Robin's Nest as a final detail for this page and it really completed it for me.  
Happy Crafting,
Tara


Wednesday, January 22, 2014

Purple Fries

Today I am grateful for the fun things Jeremiah and I do, such as our purple potato fries....
Jeremiah and I have tried so many fun things since we got married.  We are always coming up with new things to do.  This was especially fun.  We grew a great garden a few years ago.  We decided to plant potatoes we had seen purple ones and decided to grow them.  Once they grew and we dug them up we thought it would be fun to make homemade fries with them.  Here I am frying them up.  The kids thought they were so fun and they tasted so good.  
This page was a fun one to do but a little difficult because really how do you scrapbook french fries?  :) There was nothing to fancy about the page but I love the memories.  
I embellished with some diamond dew drops from The Robin's Nest, then I used some cute chipboard die cuts from Gina's Designs.  I distressed the edges of the two and covered the heart with the same purple I used running down the side of the page.  I added the yellow ribbon as a final detail and loved how this page turned out.  
Happy Crafting, 
Tara

Friday, January 10, 2014

My little sister, Rachelle

Today I am so thankful for the best little sister anyone could ask for!  I just love my baby sister Rachelle. She just celebrated a birthday this past week and I wanted to celebrate her on my blog today!!

If anyone has been following, I was doing really good with my blog....got two full weeks in....then Christmas came and with that our mom and dad O'Crowley were here visiting with us and the kiddos.  We jumped right into to more of the kitchen remodel and had some very long days working hard on that, then the kids were all sick for about a week.  I had to take a brief break from the blog to enjoy time with the family and take care of the little ones.  I am excited to get back to my everyday of things I am grateful for.

So back to my sister Rachelle - 
I could not find a picture on hand of Rachelle alone, but as you can see everyone just loves her and so does the camera! Anyone that knows Rachelle knows that she is a pint size spit fire, and I do mean this in a good way. ;) She is maybe 5 feet tall and tough as nails.  She played full contact women's football a couple years ago, she is certainly not one to mess with lol. She is so funny and has such a great personality.  There are a few photos of her with her husband Richard and oldest son Zhane, they just added another adorable baby boy, Brody to their family.  Rachelle and I are 3 1/2 years apart and I always wished we had been closer in age as I always enjoyed having her around.  She was there for the births of 4 out of 5 of my boys. She has always loved my kids as her own and was often a huge help to me with them.  Rachelle and I were able to work together a few years ago and we really enjoyed being together each day.  She lives in Utah with her family and I am in Colorado I miss her dearly and wish I was still able to see her and her boys often.  I am grateful for the phone calls and messages we share even if sometimes they are few and far between, I always know I have a sister there if I ever need anything at all and I hope she feels the same way. Happy birthday this past week Shell, I love you very much!!
For these pages I used The Robin's Nest, Green Glitter Butterflies card-stock. I also used the Distressed Purple card-stock to back my photos on both pages.  I used the pink glitter alphabet stickers for the name, also from The Robin's Nest.
I took some clear glass gems I've had kicking around my craft room and the dragonfly stickers from the Summer stickers sold by The Robin's Nest and used mod podge to keep the glass look over the stickers.  I love the accent these gave to my page.
On the opposite page I used these chipboard dragonflies from Gina's Designs and painted them two different shades of purple and dusted them in glitter.
Around the glass gems and across the bottom on the right page I used some white fiber ribbon as a final touch. Really loved how these came together!
  Thanks for reading today and hearing a little about my sister Rachelle.  
Happy Crafting, 
Tara


Tuesday, December 31, 2013

Reading together

Today I am grateful for little brothers who enjoy "reading" together...
Weston got this cute book from our friend Lauren and he just loved looking at the pictures over and over again. One day I walked in and he was showing all of the animals to Kade and talking to him about them, it was as if they completely understood one another.  It truly warmed my heart and I just had to capture the moment.  Weston and Kade are only 13 months apart and they really love each other so much, Weston can often be found just loving on his baby brother and it's so sweet!
For these pages I used the Calamity Jane Stripe card-stock, and dew drops (my favorite embellishment!!) from The Robin's Nest. You can visit and order from their website at: http://www.robinsnest-scrap.com/  
These are such fun little shots of the boys!  I added random dew drops, punched hearts and stamp shaped chipboard to dress up the page a bit without taking away from the photos.
I just added a few words for journaling down the left hand side and the boys names across the top right.
Here is just a close up of the cute embellishments for these pages.  
Thanks so much to stopping by today and checking out the blog.
Happy Crafting,
Tara


Saturday, December 28, 2013

Salt water fish tank

Today I am grateful for our 215 gallon salt water fish tank.

Jeremiah started doing salt water fish tanks about 5 1/2 years ago.  When we got married he had a 90 gallon tank. He loved the tank and really enjoyed taking care of the fish and coral.  He started to teach me all the different things about the fish, feeding, cleaning and over all care of the tank.  I have to admit I wasn't nearly as excited about it as he was.  After awhile I realized how neat it was to see all the different things in the tank and I really began to love having the tank.  We upgraded soon after we were married to our 215 gal.  This is one of our favorite hobbies to do together, and it honestly isn't the same doing it without him.....found this out while he was deployed.  

Here I have done a double layout of just a few pictures of our tank.  I used paper from The Robin's nest.  I used Glitter Pink Coral for the base.  Then my mom-in-law cut out the starfish from the Glitter Black Starfish paper and I glued them onto the corners of my paper.  I also used a few of the little green starfish on each page.  I framed the picture on the right with Glitter Purple Crackle and Glitter Pink Crackle, both from The Robin's Nest.


Above is a picture showing the great glitter paper. I used my Criut with the Paper Dolls Dress Up cartridge to create my teal coral here in the bottom corner.


This is the left page really showing off the beauty of the fish tank and all the cute page details.


Here is a close up of the adorable seahorses I made, again with my Cricut and the Paper Dolls Dress Up.  I thought these were so cute when I added them to the page, there are also a few more of the teal coral I made.  This was such a fun layout to do, and I loved working with all the bright colors!!

Happy Crafting, 
Tara


Wednesday, December 25, 2013

Christmas

Today I am thankful for Christmas.
I just wanted to start by wishing everyone a very Merry Christmas. I am so thankful to be able to celebrate the birth of our Savior, Jesus Christ.  I use to not really be a big fan of Christmas because I feel it has become far to commercialized and people are not remembering the true reason for this season.  Jeremiah and I have tried to teach the kids why we celebrate Christmas and that it is not about the gifts we get, but rather the gifts, or better yet the service we can give others. They are still young and learning and yes we still hold the fun traditions of some gifts and stockings. Jeremiah shares the story of the birth of Christ first keeping the focus on him, then we have followed a tradition from Jeremiah's family where we open presents on Christmas Eve, and all of the presents are from mom and dad. Christmas morning they get their stockings filled with goodies and such and this is what comes from Santa.  This is our family tradition, what are some of your favorite traditions you do in your home?


Today I thought I would change things up a bit and craft a Christmas card.  I didn't want the standard red and greens so I when with black, red, white and some silver.  I used white embossing powder to really give the pop I wanted on both the red and the black card-stock.  I used stamps from the Holiday Wishes set.  I really love how this turned out.  I added some silver embossing powder with my white on the little snowflakes and tied a sliver ribbon around the card to mesh the red and black better without having a bold line.  I added some black dew drops from The Robin's Nest for the final touch this card needed.


Here is a closer look at the embossed snowflakes, ribbon bow and dew drops.

Hope you all have a wonderful Christmas with family, friends and loved ones, stay safe!
Happy Crafting, 
Tara


Tuesday, December 24, 2013

Outing to Old Colorado Territory Days..

Today I am grateful for the fun family outing we had last summer with all of the boys to the Territory Days in old town Colorado.


Jeremiah decided it would be fun to have the old fashioned pictures taken while we were there.  The boys loved getting to hold the guns and be dressed up like cowboys.  They all looked so cute too, even little Weston who was just three months old was all decked out like a little stud.  They were all so good and we really got some great shots.  I have had these pictures hanging around my room where I can see them because I have loved them so much and I was so happy to finally put them into a scrapbook.


This one made me laugh so hard when we first saw it, everyone was in perfect character pointing their guns at daddy, and looking at him too.  I used the striped side of the Cowboy paper from The Robin's Nest.  I used some brown mailbox letters for my words.  I stamped and embossed the scallops, stars, and paisleys with the Wanted stamp set and a copper emboss powder from Stampin; Up!.


Just a little close up of the embossed scallop circles.


Again I used the mailbox letters, and this page shows off my embossed paisleys. I placed these on the page with foam pop ups to give the page just a little more dimension.  
We could not have asked for a more perfect picture, everyone is actually looking at the camera, eyes are open and smiles all around!!


  I know we all really enjoyed taking these pictures and they whole day just being together.
I love having pictures of the fun memories we have made together as a family and love to be able to scrapbook them and share it with others.

Happy Crafting, 
Tara

Monday, December 23, 2013

Joseph Smith

Today I am thankful for the first prophet of The Church of Jesus Christ of Latter-day Saints, Joseph Smith.


I am grateful for Joseph Smith for having the faith to do the things he did to restore the fullness of the church to the earth today.  I have a testimony that he saw God the father and his son Jesus Christ at the young age of 14, when he prayed to know which church to join.   I am truly grateful for this because the gospel and being part of the church brings a happiness to my life that nothing else in the world could ever do.


Not sure if you can read the journaling I did here with this picture, but it explains where this came from.  This is an actual photo hanging in mom and dad O'Crowley's spare bedroom. This is Jeremiahs favorite photo of Joseph Smith and in person it is quite a neat one to see.  It felt fitting to use it for this page.  I used The Robin's Nest paper called Service.  The words printed on this paper were perfect to describe Joseph, patience, service and brotherly love.  


I found this picture of Joseph and his wife Emma Smith and thought it was perfect to add to the page.  I added some dew drops to embellish and it added the perfect bit of elegance I wanted.


The bottom left is a picture of a statue of Joseph that I believe is at Temple Square.  It is a beautiful representation of the Prophet and really looked good with the other two photos I had chosen.  
I was grateful to be able to post this today as it is not only my dear handsome husband and his twin Jessiciah's birthdays but it is also Joseph Smiths birthday as well. 

Happy Crafting, 
Tara


Saturday, December 21, 2013

More functional and usable space..

Today I am grateful for more functional and usable space.


The left page is the cubby space and closet in our master bedroom when we bought our house last year.  We have since painted the room a beautiful midnight blue with white trim, as you can see in the pictures on the right page.
It only took one look at this wasted space, for Jeremiah to say he was going to open it all up and put some shelves in.  That is just what he did last summer.  We wanted to make the space really feel like a part of the room and so we carried the colors over into the bookcase area and it really looks like it has always been there.  He gave the shelves a beautiful curve instead of just a plain straight across.  We have so many books and various decorations and items from places of travel.  It is so nice to have all this space to store and display so many of the things we love.
For this layout I used just some nice textured blue card-stock. Lined my pictures with a red.  For the before page I used a lot of rub-ons and a few dew drops for some dimension. 


Here is a close up of the bookshelf. We hung some rope lights around the inside where they can not been seen and have them on a timer so they light up the room very well in the evening hours.  


I really struggled at first scrapbooking these pictures.  The colors in the before pictures are just awful and they aren't exactly exciting.  I ended up really liking them when all was done and said but it sure took some creativity for me to be happy and feel like they were actually complete.  I used a journaling tag from The Robin's Nest and made a darling clothes line with items hanging from it, I kept laughing at this cause I just thought it was so dang cute!


As for the closet, we took off the bulky doors.  When they were open they hit the bedroom door so we decided to just take them off.  Shortly before Jeremiah left for his deployment he finished the closet.  I swear we have become pros at figuring out how to get more functionality and usability out of small spaces, and this was no exception!  He built these great square boxes in the top part of the closet that have fabric boxes in them, this allows for storage of the smaller clothing items or things that are worn less often. At the bottom where there was so much space that seemed wasted he built a couple more boxes and shoes racks.  You can see that he left a section on the far left so that my dresses still hang nicely without getting bunched up.  
All in all both of these projects turned out very well, I have plenty of space for just about everything!

Happy Crafting, 
Tara


Wednesday, December 18, 2013

O'Crowley Sisters

Today I am grateful for the amazing sisters I received when I married my husband.


This was such a fun page to create and I just LOVE how it turned out!!


Here are the O'Crowley women, a force to be reckoned with for sure!  What a great group of girls and I am so happy to be one of them.  From left  to right we have Rachel, Jessiciah, (Robin - mom) Robyn, Tara and Brittany.  We took these photos on Thanksgiving day and unfortunately Brittany was unable to make it, fortunately enough we saw her and her family a few days earlier and had this picture of her to combine with the other sisters.  I love the accent flower in the upper left corner made from tear drops and a small dew drop in the middle.


Here I added a beautiful silver embossed emblem saying "friends", the picture doesn't fully do it justice,  it is bright and shinny and really adds to the page. I placed a pink flower cut out with a punch I had and added another tear drop flower to coordinate with the one up on the top portion of the page.


Using the same punch, I made this cute trio of  flowers next to the picture of us girls.  I feel like it really gave the page the final balance it needed.  


Here is the complete page again.
 These are great women and I truly consider them all to be not only sisters but friends!

Happy Crafting, 
Tara


Tuesday, December 17, 2013

Home cooked foods...

Today I am grateful for home cooked food. 

 This is something that I have always enjoyed.  I grew up in a home where there was always a home cooked meal on our table every night and a wonderful one at that.  These four meals were actually made while my mother was here staying with me after I had our last son Kade, this past April.  Jeremiah was deployed and my mom and I enjoyed a couple weeks together and we ate some really yummy food.


Here we have Garlic Spaghetti, Crepes and Omelette.  I used The Robin's Nest - Veranda Explore/Stripe card-stock.  I also accented with some dew drops, round and diamonds. I wanted to keep things simple and used just a few little frames I had in my craft room to highlight the name of each food.


On the second page we have BBQ Chicken Pizza and Honeymoon Delight.  I used a fun journal card-stock, again from The Robin's Nest.  I went with a black border and sponged the edges in a brown. I really like adding some personal handwritten message to my pages when I can.  
 I am really happy with how these pages turned out, especially since I do not think I have ever crafted pages just around food. :)   Thanks for checking in today.  Until tomorrow...
Happy Crafting, 
Tara

Monday, December 16, 2013

My husband, Jeremiah

Hello, hello.  Welcome to Hidden Scrapper!  My name is Tara O'Crowley, I am married to a wonderful man named Jeremiah and we have five handsome little boys. I have the privilege of being a stay at home mommy to three of our five little guys.  Our older two boys live in Utah with their dad and step mom.    I am very excited and a bit nervous to be honest, about FINALLY starting my actual blog.  
  I will be posting at least once a day for 365 days!!  That's right, everyday for at least one year is what I have committed to.  To give a little detail about the blog.....Jeremiah challenged me a few weeks ago to start my blog, but there was more to it than that.  He challenged me to blog and scrap about something that I am grateful for and each day has to be something different with no repeats.  I took a minute to think about it and decided this would be a wonderful thing for me to do.
 So without further ado lets get things started!

Today I am grateful for this man...


This is my husband Jeremiah.  He is truly my best friend.  He is a wonderful father.  A dedicated and honorable Army Officer.  He is a loving son, brother, and uncle. Those of us who know him, would consider him to be very sarcastic, and playful.  He is one who would truly do anything for anyone, at anytime. He is far to often misunderstood and read wrong.  He has a love for gardening, our 210 gallon salt water fish tank,  working on the home improvements and our soon to be newest adventure, sailing. He is so talented and can honestly do just about everything, and do it well!  

Fist page and a close up view of the dew drop swirl.

  These 12 x 12 pages were done on The Robin's Nest Olive/Stripe card-stock. 
The dew drops (cute little embellishments all over the page) are also a Robin's Nest product.
I created a nice accent swirl around the top corner picture with the dew drops.  I also added a Time Flies rub-on from The Robin's Nest.
You can check out their store at  http://www.robinsnest-scrap.com/  I will be using a lot of their products on my blog so keep their website handy in case there are things you would like to order for your own crafting needs.
Second page and a close up of the words, ribbon and dew drops.

I used some brown stickers for his name. I found an Army rub-on and added it to the corner of his military picture in his dress blues. With my cricut I cut out in brown the words, Soldier, Husband, Father and Friend.  I placed a small piece of Stampin' Up! ribbon behind each of these words & added a few dew drops.  Then I drew stitches on each letter to complete my look.  Scattered a few dew drops in various places on my two pages for a final touch.  Here is my two page layout once again.


Thanks so much for joining me today.  Until tomorrow.
Happy Crafting, 
Tara


Wednesday, October 9, 2013

3D Stars

Hello and welcome, I am going to share a project that I did a few years ago but thought now was a great time to re-share it, and I also had it re-pinned on Pinterest recently and I told a gal Michelle that I would get the instructions up for her, so thank you for the motivation to post something.  

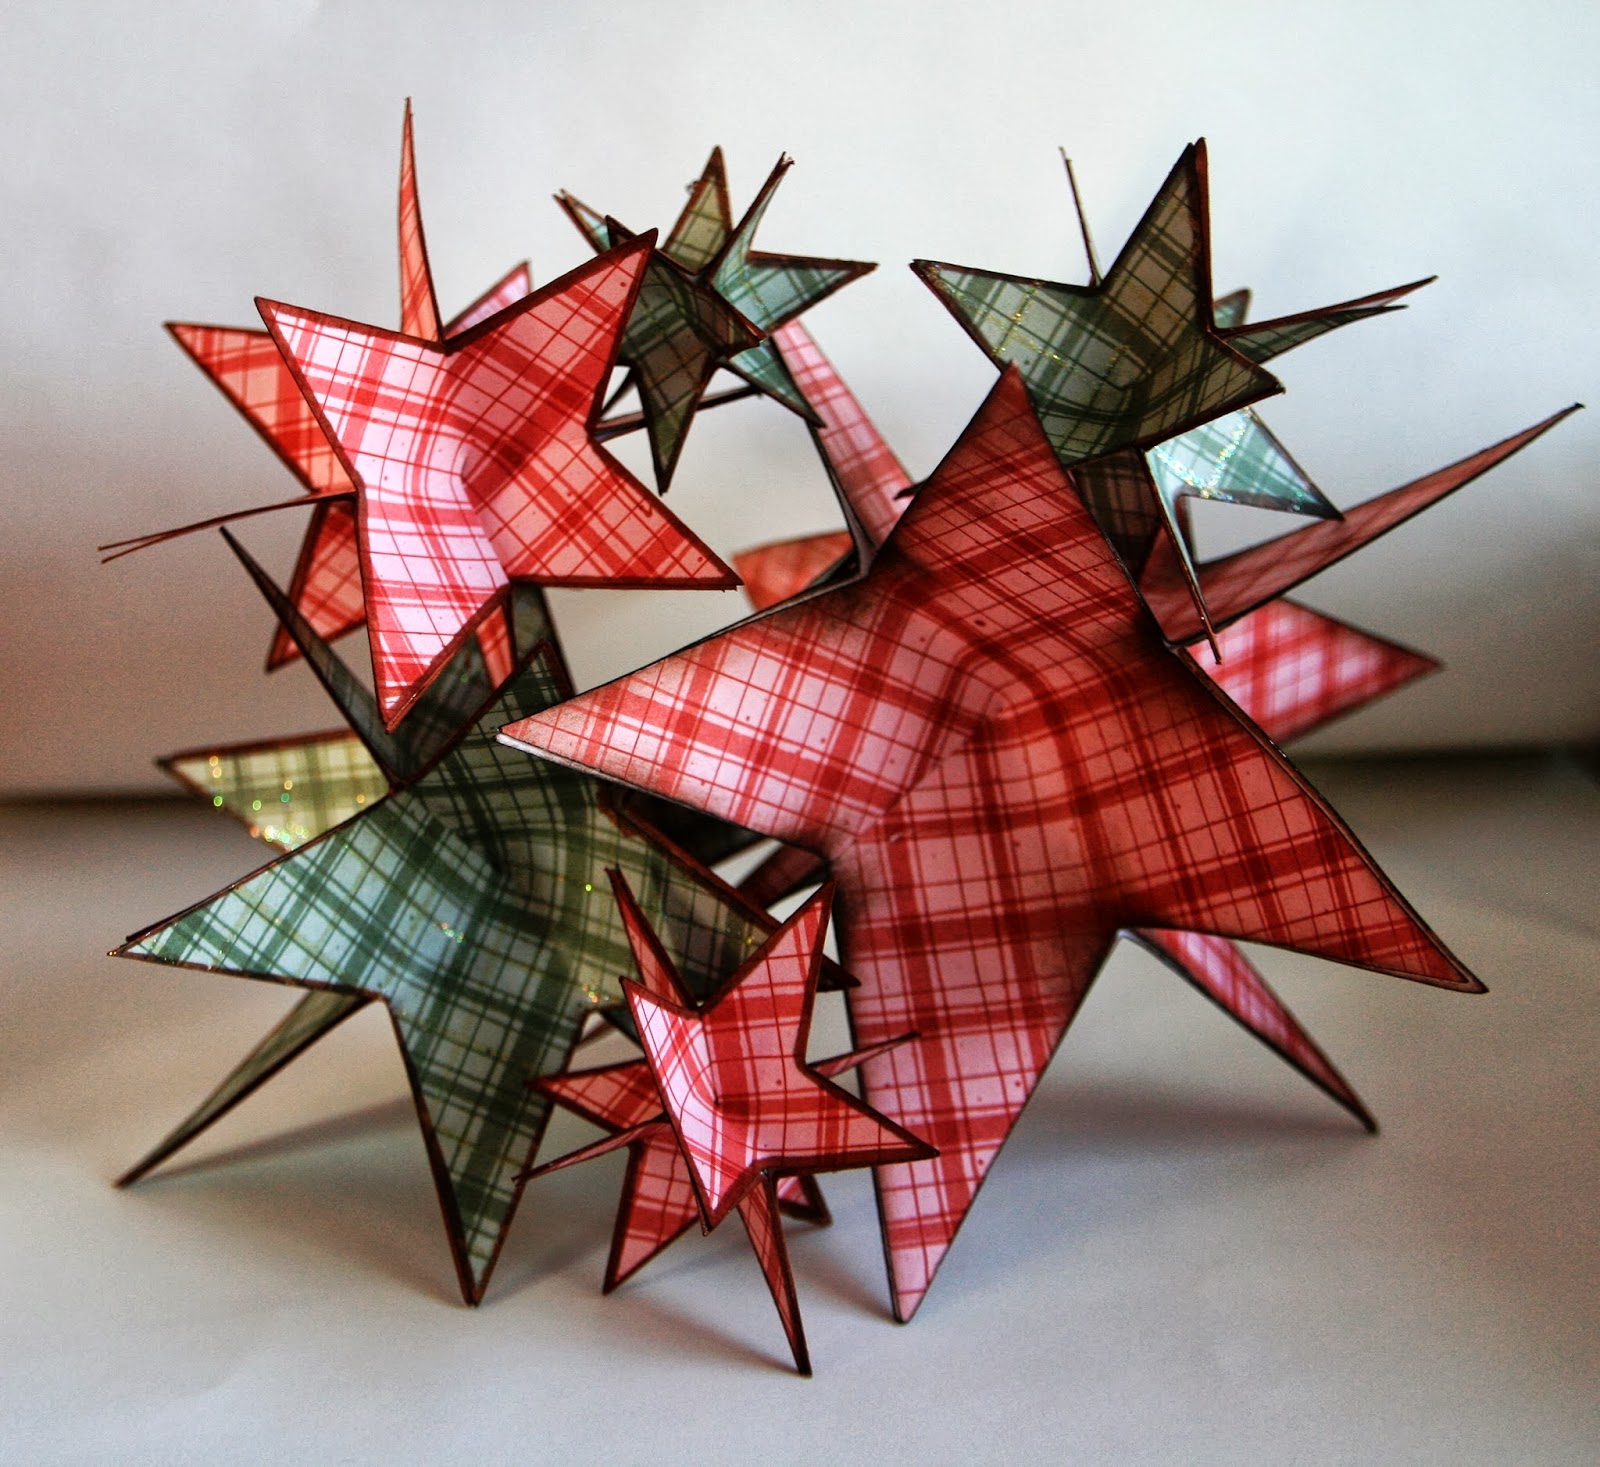
Here is what our finished project looks like.
You are going to start with six stars in any size and also any print of paper that suits your fancy.  I used this fun paper from The Robin's Nest ( http://robinsnest-scrap.com/ )  I cut these stars out with my cricut machine.  I am sure you could also find some clip art online that would work fine too.
Next you are going to make a cut through the middle of each of the stars as shown below. 
(there are only four of the six stars shown in this picture...you do need all six )
After you cut each star, you are going to fold one of the points over the other on all six stars so you only have four points to each star and glue into place.
Here is a look at it from the front.
Here are all six stars folded and glued.
Next you are going to start gluing them together, be sure to line the points up as best you can.  They will not all line up perfect so don't stress about that
Getting the first three-four together is no problem, it gets a little tricky, but not to hard with the fifth and sixth.
You will notice here below that you can see white from the back side of the paper I used, if this doesn't bother you, you are basically done with this step.
If you are like me and the project doesn't feel quite finished with the edges white, I just took a brown Sharpie marker and colored along the edges to give them a more completed look, you could also sponge the edges with ink if you like that look better. With that the fun 3D stars are a finished success!! 

These are a super fun and easy project to do.  I used them in my home as a centerpiece for the holidays, mixing two colors and several sizes together to make a great "pop".  You could also add a ribbon and hang them on a tree or just as a hanging decoration in your home.  

Thanks so much for looking and please if you have questions or comments don't hesitate to ask/share.

Happy Crafting, 
Tara